리스트
지난 포스트에서는 명령어를 추가, 실행해보고 기본적으로 제공하는 데이터를 사용해봤다. 만약 특정 명령어를 실행 할때 다른 정보도 같이 받아야하는 경우는 어떻게 처리해야할까?
그런 경우는 다음과 같이 처리할 수 있다.
명령어에 추가 정보를 받아야 할 경우
| const { prefix, _ } = require('./config.json') | |
| client.on('message', message => { | |
| if (!message.content.startsWith(prefix) || message.author.bot) return; | |
| const args = message.content.slice(prefix.length).trim().split(' '); | |
| const command = args.shift().toLowerCase(); | |
| if (command === 'ping') { | |
| message.channel.send('Pong.'); | |
| } else if (command === 'args-info') { | |
| if (!args.length) { | |
| return message.channel.send(`You didn't provide any arguments, ${message.author}!`); | |
| } | |
| message.channel.send(`Command name: ${command}\nArguments: ${args}`); | |
| } | |
| }); |
4번째 줄은 config.json에서 설정한 prefix로 시작하는 명령어가 아니거나 메세지를 입력한 사용자가 봇인 경우는 반응하지 않고 return한다.
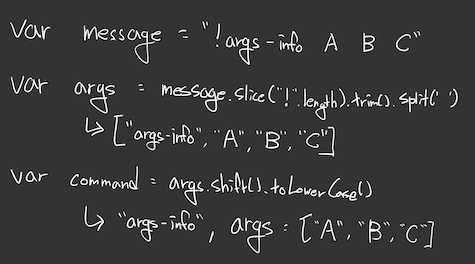
6번째 줄은 입력된 명령어를 prefix를 제외한 나머지 문자열을 구하고(splice) 앞뒤 공백을 지우고(trim) 띄어쓰기를 기준으로 자르고(split) 배열이 된 명령어를 args에 저장한다.
7번째 줄은 args의 첫번째 요소를 제거하고 제거한 요소를 반환(shift)하고 소문자로 변경(toLowerCase)한다.
즉 다음과 같은 형태를 확인 할 수 있다.
11번째 줄에서 명령어는 command 변수에 있으므로 기존 message.content가 아닌 command를 이용한다.
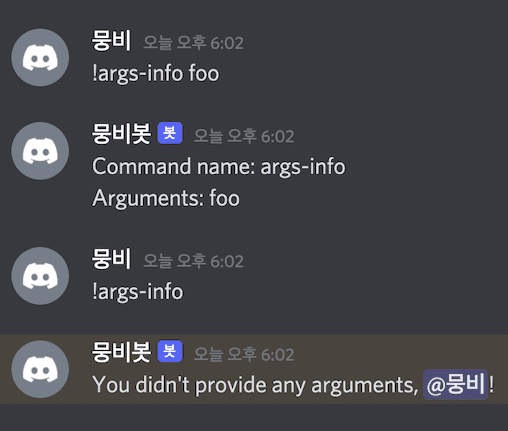
12-14번째 줄은 args가 없을 경우에 오류를 반환한다.
16번째 줄은 올바른 명령어의 경우 명령어와 args를 표시해준다.
자 이제 명령어를 추가하는 방법까지 배웠다. 하지만 여러가지의 명령어를 사용해야 할 경우 if/else if를 이용하여 더 많은 명령어를 작성할 수 있지만, 많은 양의 명령어를 사용할 경우에는? 외부 모듈을 사용해야할 경우에는? 코드가 길어지고 알아보기 힘들고 종속성이 생겨 수정하기도 힘들어진다.
이때 파일 시스템을 이용하여 코드 스플릿을 하면 이를 완화 할 수 있다.
우선 ping 명령어를 분리해보자. 최상위 폴더에 commands라는 폴더를 생성하고 그 안에 ping.js 파일을 생성하여 다음과 같이 설정한다.
| module.exports = { | |
| name: "ping", | |
| description: "Ping!", | |
| execute: (message, args) => { | |
| message.channel.send("Pong."); | |
| }, | |
| }; |
그리고 index.js에 다음과 같이 수정한다
| const { Client, Intents, Collection } = require("discord.js"); // new | |
| const { prefix, discord_token } = require("./config.json"); | |
| const fs = require("fs"); // new | |
| const client = new Client({ intents: [Intents.FLAGS.GUILDS] }); | |
| client.commands = new Collection(); // new | |
| ///////// new | |
| const commandFiles = fs | |
| .readdirSync("./commands") | |
| .filter((file) => file.endsWith(".js")); | |
| for (const file of commandFiles) { | |
| const command = require(`./commands/${file}`); | |
| client.commands.set(command.name, command); | |
| } | |
| ///////// new | |
| client.once("ready", () => { | |
| console.log("Ready!"); | |
| }); | |
| client.on("message", (message) => { | |
| if (!message.content.startsWith(prefix) || message.author.bot) return; | |
| const args = message.content.slice(prefix.length).trim().split(" "); | |
| const command = args.shift().toLowerCase(); | |
| //////// new | |
| if (!client.commands.has(command)) return; | |
| try { | |
| client.commands.get(command).execute(message, args); | |
| } catch (e) { | |
| console.error(e); | |
| message.reply("there was an error trying to execute that command!"); | |
| } | |
| //////// new | |
| }); | |
| client.login(discord_token); |
9~17번째 줄은 commands폴더에 있는 .js로 끝나는 명령어 파일들을 가져와 각 파일에서 선언한 name을 바탕으로 명령어 정보를 저장한다.
31번재 줄은 입력한 명령어가 저장된 명령어에 없을 경우 return 하며
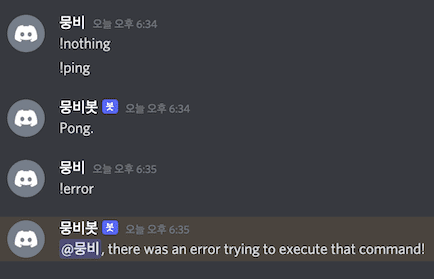
33~38번째 줄은 입력한 명령어가 저장된 명령어에 있을 경우 명령어를 실행하고 오류가 생길 경우 문제가 있음을 반환한다.
마치며
디스코드 봇을 만드는 가장 기초적인 단계는 모두 완료했다. 이제 외부 모듈 등 사용하는 것은 나의 역량에 있다. 다음 포스팅은 데이터베이스(MongoDB)를 사용하는 법에 대해 포스팅할 예정이다.


